
I am back with another tutorial for adding files to Google Docs. Even though there are a few steps to this process, once you have learned the process, you will find it takes just a few minutes. One of the benefits of having files linked to Google Docs is so that your files are in one place, and accessible anywhere on the Net. If you are on vacation, or using a different computer, you can access your materials.

1. Step 1 is to make sure you have a Gmail account. Most people are using Gmail as their go-to email system for their Blogs or TPT Stores. The first screenshot will show you what my inbox area looks like. (It's empty because I keep all of my emails sorted in folders!) Having a Gmail account will allow you to set up cool things like a Google Calendar, use Google Drive, etc. The purple arrow is pointing to the top tool menu to where it says DRIVE. You will click on that tab, to be taken to the next page.

2. Once you have entered the Google Drive, you will look for the red CREATE button on the left side of the screen. You have different options here, which I will explain below.

The purple arrow shows that if you click on Create, a menu will drop down giving you options to use different documents, or create a folder. I have used the folder tab to create specific folders for giveaways. (You can name your folder anything you want). If you use Google Drive a lot, you may want to think about using different folders to separate your resources from those that you may download from other people. For this tutorial, we are going to just load a product as if you didn't have folders set up. NOTE - You do NOT have to use the tabs under the red Create, you can upload ANY file onto your Google Drive!

3. File selection. Click on the little symbol next to the red Create button. This button gives you the option to upload a file or folder. Click on FILE and you will be prompted to select a file from your computer.

4. Select File from Window - When I clicked on file, a box pops up which allows you to select a file from your computer as mentioned above. I chose a PDF document that I wrote. Once the file has been selected click OPEN. This will open the download screen.

You will see that the download is in progress by the little indicator. You can monitor the progress of the download at the bottom of that box.

5. After the upload. Once the file has completed, the indicator will show that it has been uploaded, and you will see a blue share link. The share link will give you some options for sharing the link to your file.

6. Setting permissions for file. This is a really important step. Google Docs has a feature that lets YOU set the permissions for viewing the file. The purple arrow points to the privacy settings. The standard (default) setting is Private. Which means that only you can see the documents on your Google Drive. By clicking Change, you will be prompted to other options for this particular download. Note, you will see the link to your download in blue at the top of the screen. If you paste that link before you have set the permissions, you will wind up having people email you wanting to know how to access your download! :)

Here, you will see the 3 different settings. Public, Anyone with the Link, and Private. When putting a document on my Blog for a giveaway or freebie, I select "PUBLIC." This is so that I still have control over where the link ends up, but I don't have to approve permissions for thousands of individuals who want to download my item. (By selecting Private, you can choose who is allowed to download or just yourself).

7. Copying the Link - After you have set permissions, you will be able to copy and paste the URL to your download. If you are a little concerned about the length of the URL, you can use Google Shortener. I personally like the Google Shortener because it gives you a little bit of stats for how many people have downloaded your item. If you do not wish to use Google Shortener, then this is where your tutorial ends. You will paste the link to the body of your Blog post either as a line link or as a link on an image. If you'd like to see how Google Shortener works, continue on.
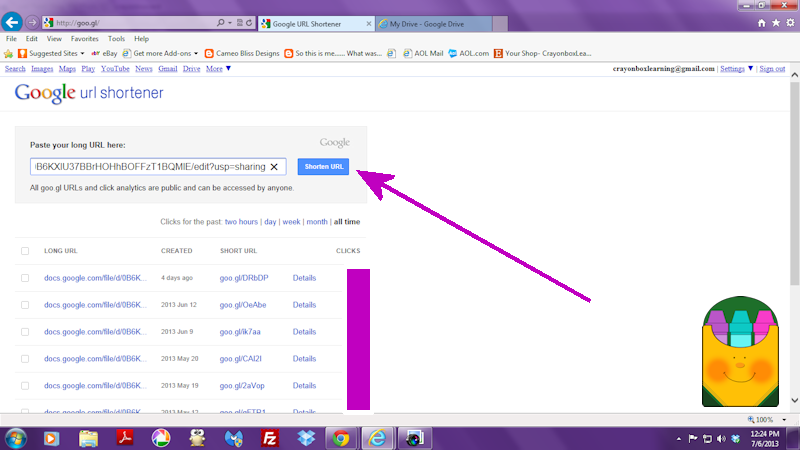
8. Google Shortener (http://www.goo.gl) is neat as it allows you to take a really long URL and make it into a small one. (Somewhat similar to TinyUrl.com). You will paste the long URL in the box shown (purple arrow).

After you have clicked the button to shorten the URL, the screen will change and you will have the shortened URL. With the short URL, you can then copy and paste that into the body of your Blog post, or use as a direct link in an email or on Facebook.
That's all there is to it!
If you would like to use Google Docs to host your exclusive fan freebies for Facebook, my tutorial for adding a Fan Gate using Woo Box will walk you through the process. {TUTORIAL HERE}
If this tutorial helped you, please let me know. If you get stuck or have questions, feel free to contact me via email.


This post and the Woobox tutorial helped me so much! Thank you for sharing. I'm just getting started and should have my blog up and running in the next few weeks so these posts will help me get going. Thanks again!
ReplyDeleteVictoria
Educar con una Sonrisa